Space Booty has officially released! It can be downloaded here on Itch.io.
My final thoughts can be seen in the postmortem video starting at 9:24.
Space Booty has officially released! It can be downloaded here on Itch.io.
My final thoughts can be seen in the postmortem video starting at 9:24.
This sprint was a lot of polish and finalization improvements from me. For example, I got into Unity’s built-in animator system to get weapon selection animations for the different player weapons.

This involved a little bit of code integration but I was fortunately able to get most of the logic working in the animator. I think it came out looking really good. You can also see the new ammo HUD, I didn’t make the UI myself but I got all the code integration working so that it updates with the respective weapon ammo counts.

In a similar vein, our team created some particle effects, and it was my responsibility to get them activating at the right times. I benefited a lot in this case from keeping my code organized, since I could go back into the base classes and add an explosion effect to play as a default on any enemy’s death. And the inheritance properties still let me go into individual objects and, say, scale up the explosions for that one in particular.
For space stations, which aren’t typical enemies, I had to go in manually but I saved some resources by getting the explosion size to scale with the number of battlements, so that larger stations automatically know to make their explosions bigger.

The absolute largest task and biggest responsibility was getting all of the game’s sound effects working, since our team got together some sound files. This was a task that would’ve greatly benefitted from more earlier planning, but still came together decently well and I was able to retrofit all of the game’s objects with sound effects.
The big challenge of this system is that every object has to activate sound effects at different times. The pickups make a noise on pickup. The battlements make a noise on death, firing their attack, and repositioning. The player makes a host of noises on firing, weapon switching, taking damage, and dying.
So most objects needed to be manually assigned when to play their sounds in code, since everything functions so differently. But to help keep the process consistent, I did some research online and figured out how to set up a sound manager instance, which all objects can reference whenever they need to play sounds. Rather than each object having its own sound emitter, they call the sound manager which will assign them a copy of a prefab object that emits the sound and is then removed. I followed a lot of it from guides online but had to design my own function for looping sounds that are toggled on and off, such as the spaceship thruster sounds.
Overall, the sound system ends up working well and sounding awesome, adding a huge amount of style and polish to the game.

Lastly, I wasn’t given a model yet but started on the basics of our final boss enemy. Its behavior for now is mostly pretty simple, since it stays in one place and fires homing rockets. The homing rockets, however, required a new script that was pretty fun to assemble. I wanted to make them more interesting so I have them spherically interpolate similar to the doom tower, meaning that the player can evade them by turning quickly. I set them each up with some modifiable properties for how long they chase the player and how fast they turn, and they make for an engaging part of the final boss fight. I look forward to finishing it up in the last sprint, where the speeds and timings will certainly be more refined.
Ideally we wouldn’t be making major changes to things this far into development, but everything’s been kept encapsulated and organized enough I think it should be okay. The team is meeting soon to do some assembly and polish before the beta build, and the game should be feature complete by then.
The doom tower is, by far, the most complicated and impressive thing I worked on in Sprint 5.

The tower has two separate joints it pivots on, and as such, required a lot more math to get its aiming working properly. The base joint rotates to face the player as normal, but the second higher joint was more of an issue. After spending a long time trying all sorts of different solutions, I fell back on trigonometry to cut through to a solution.

Essentially, in order to find the angle at which the dish should point, we need to take the inverse tangent of the difference in y over the difference in x. Additionally, we don’t necessarily know which way the base joint will be aiming, so what I'm considering the x difference on the intersecting plane may actually require a distance calculation in three dimensions. We can find the appropriate value by using the distance formula on the x and z coordinates.

Getting the laser beam itself working was tricky as well, but I found the easiest solution was to just create my own model for it with a pivot at the end, so I can simply scale it forwards along one axis to match the distance it needs to go. Default Unity cylinders have their pivot at the center, which wouldn’t have worked for this.
Ultimately I really like how it chases the player in real time because it gives expert players the chance to try to dodge it if they can react fast enough. I think players often find it unfair when there's no way to avoid an attack, so I'm really glad I put the effort in to make the death ray something that really works and isn't just simulated with instant damage.

Next coolest thing is definitely the death ray. This is the final weapon for the game and required a few more bells and whistles than the others. First, it has a slightly modified projectile script that doesn’t get destroyed on collision. Most of the code is stored in the weapon script which handles its movements instead, since everything has to be more precisely tuned. It has a function that, using the same model as the doom tower, can rapidly scale the projectile forwards to mimic emitting a ray. For extra style, the ray disappears at the end by rapidly shrinking.
The biggest change was that the firing mode requires the player to hold the button down for a few seconds, which means I had to set up a new input function that cancels the charge-up when the fire button is released. It uses a coroutine that, after the initial press, waits for a second and cancels if the button is released, firing the laser if otherwise.

The biggest responsibility I had this sprint was getting the models imported from our modelers. Some of these were straightforward and one-to-one, but for some like the space stations or rotating lasers, I had to modify the code since the models had more moving pieces than anticipated. Others, like the enemy spaceships, were at a different scale than anticipated and as such had to have their movement variables (speed, range, etc.) readjusted.
A bunch of the new models can be seen in this gif, as well as the lives system I implemented to go with the new pickups and our designer's game over screen. As a programmer, I wanted to focus on making the prefabs developer-friendly by keeping them limited to only a few pieces, or preferably just one. When prefabs contain multiple pieces it can be easy for developers to accidentally click on the wrong one in the scene view. For some prefabs I just had to make new ones entirely, which felt suboptimal to me since the old ones had to be manually swapped out. I think this was good experience getting practice with using art assets in Unity, and is something I would like to learn more about.

Lastly, I got some basic animations working for the player’s ship, which will be expanded upon in the next sprint.

During Sprint 4 our team got a lot of good feedback from the playtest, and while the game design seemed to mostly work pretty well, all testers had issues with the controls. So the most important improvement I made this sprint was definitely revamping the controls to use the mouse for the camera. In line with this, I also set up weapon switching to use the scroll wheel.
After doing a little bit of research things weren’t as difficult as I thought they would be, using the existing code with a new control binding that reads the mouse delta to detect movement. The main change is that now the code runs in Update instead of FixedUpdate, which deviates slightly from how I’ve been taught to do things, but it’s necessary in order to get the camera rotation smooth and fluid.
One problem I solved was that the editor can be a bit clunky to use while the game is tracking the mouse, so I quickly put together a simple pause menu that’ll freeze the game and make the mouse visible again. This perfectly makes the new controls easy to use now and sets us up well for later.

The first big challenge of the sprint however was getting the new prefabs imported. I worked alongside our producer to ensure everything was working correctly, since certain parts of the models needed to be fixed in Maya and re-imported. For the space stations, we created templates without battlements so that designers can swap in and out any type of battlement. My main contribution was giving them collision boxes so they function in gameplay, and re-establishing their prefabs with the new object organization.
The more challenging part was getting the cannon battlements working again—their math before was relying on them being a certain size, and the finalized model is a bit higher than the placeholder. I updated the Pythagorean math and made sure it scales with the height the player is at. I used a similar technique for the loot space stations drop to ensure they spawn at the correct height for players to pick them up. The reason I made these changes was so that designers don’t have to worry about building their levels consistently around y=0, and can eyeball it a lot more without breaking things.

The fun part of this sprint, however, was obviously the explosions. The two exciting features I implemented were the player’s fourth weapon and the bomb towers. The player mines can be dropped behind the player and will explode on contact with an enemy, or after a few seconds. The enemy bomb towers work in a very similar way, with code that is mostly copied over with a few differences.
The only trick was that I needed both players and enemies to take damage from triggers as well, since explosions should be a trigger zone that can be passed through. For enemies, the player mines deal no damage since it should all come from the explosion. For the player, both the mine and the explosion deal damage and the player’s immunity frames ensure they’ll still only get hit once.

In order to get the bomb tower to launch bombs properly, as it rotates, it spawns four bombs at its head, each with a rotation of 90 degrees from the previous one, and uses a force to launch each one forwards relative to its rotation. The bombs I’m pretty proud of—they start being affected by gravity, but stick in place once they hit the “ground” which is set to the player’s height. This way, the visual of them being launched plays out perfectly, and their gameplay functionality is still mathematically consistent.
Lastly, there were a few other improvements, such as enemy AI improvements, checkpoints, and stargates at the end of levels. Overall I think this was another good sprint for me. I had a little bit less to do than before but the changes made this sprint were very important ones crucial to the polish and feel of the game. I think that the improved controls will make players really like the game, and that the new features added will be exciting.
.gif)
Sprint 3 was all about getting the game ready for the alpha build so we could present it at a public playtest. That means I focused on the one major component that was still missing: enemies. This gif shows off how it looks in game, these small enemy corvettes chase after the player and fire lasers when they get close (though everything's been made even faster in future updates).
I borrowed a lot of code from the battlement cannons, since I’d already set up stationary turrets that shoot at the player and can be shot at in turn. This meant that healthbars, projectiles, and damage were all already set up. What I needed to add was movement, which I did in a similar method using spherical linear interpolation of the corvette’s rotation to face the player. I made them rotate much faster though, so while they do need to re-orient themselves as they chase down the player, they’re threatening in packs because they’re quick at it and likely to attack from the front or behind.
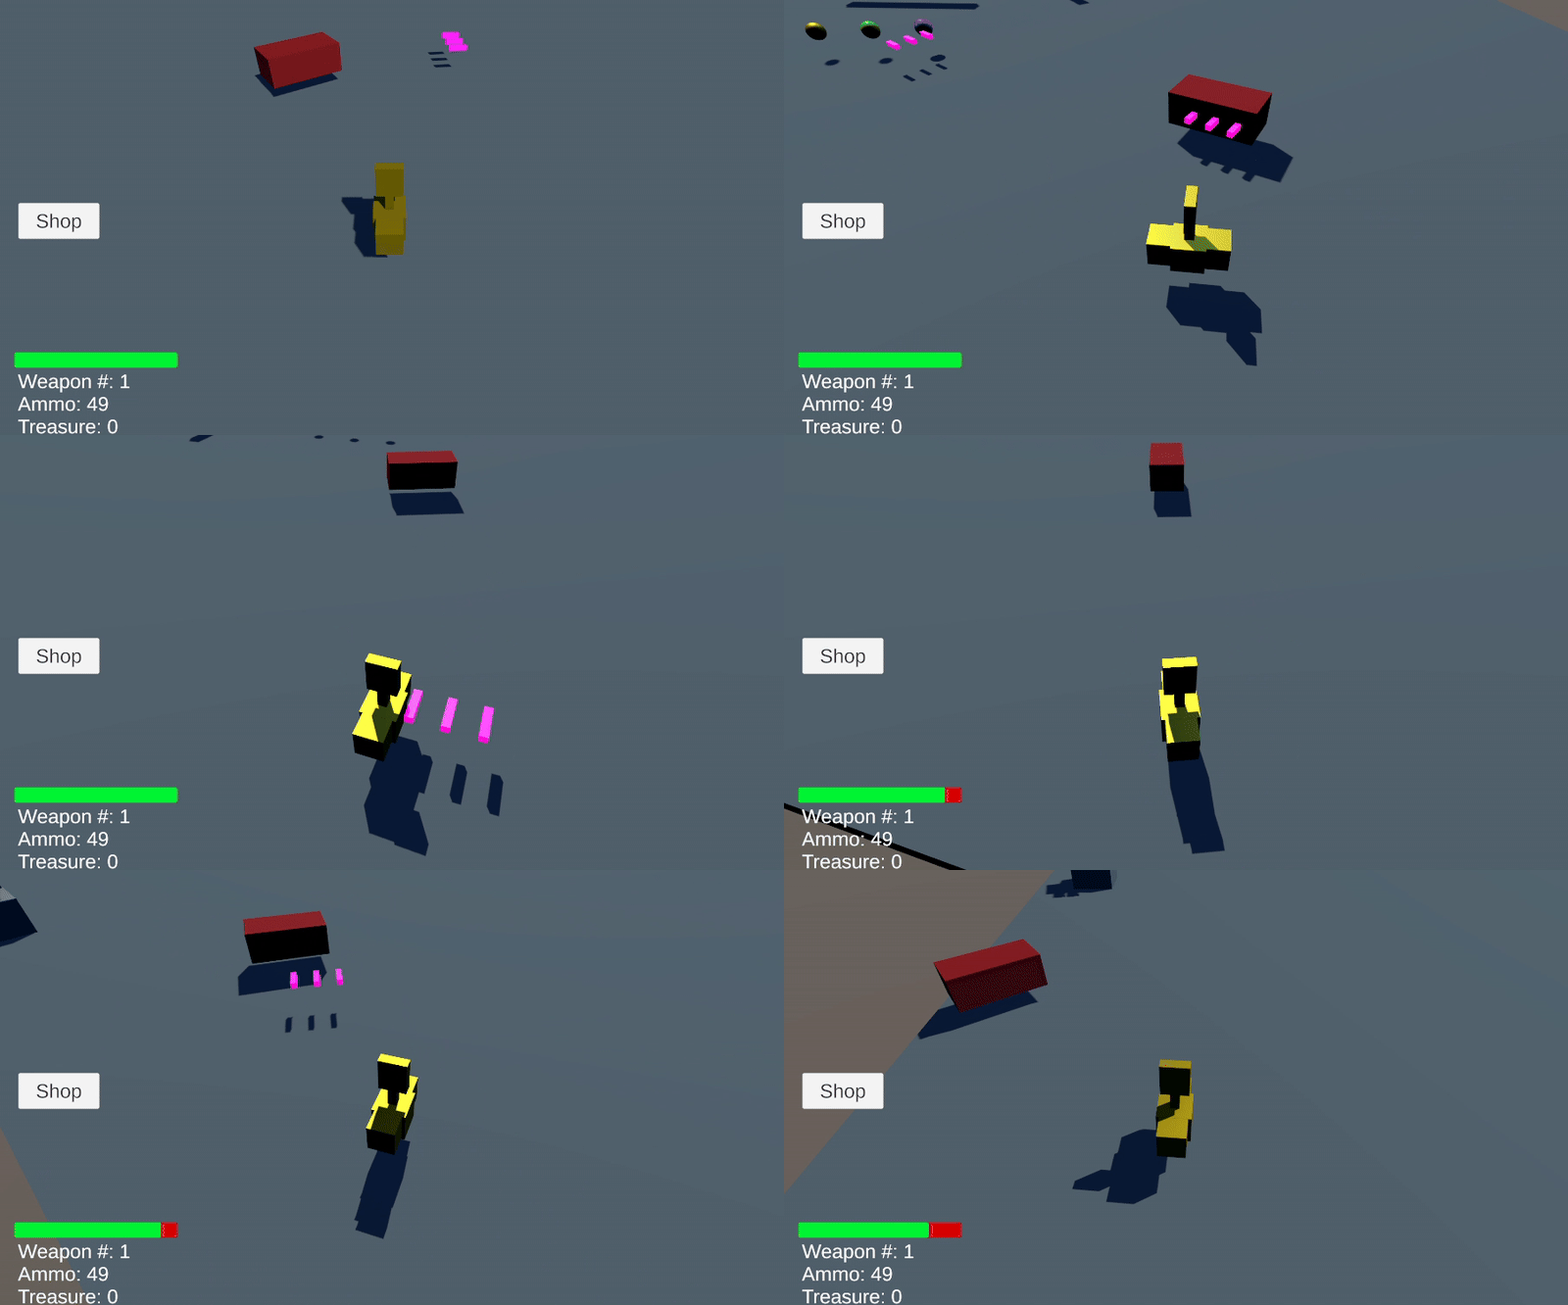
The movement for the frigate enemy was even more complex, which I broke down into three states: idle, chasing, and attacking. Once within its vision range, the frigate starts chasing the player at high speed, but once in attack range, it needs to be able to line up its laser barrages from its side-mounted cannons. So I have its interpolation change based on its state, orienting around a rotation vector from either its front to the player or its side to the player when it needs to attack. You can see it make this adjustment in the gif.


What was a fun challenge was adding the upgrade shop, built up from simple treasure pickups I added using my existing pickup code. I started with a ShopMenu script that manages the whole menu, being enabled/disabled by hitting the shop button. It has a masterlist of references to the player and each button in the shop, and connects the player’s button presses to the appropriate upgrade.
The button references double as data storage for upgrades, since each button also contains the info for its matching upgrade. The ShopMenu directs their behavior, telling them when to update their text or attempt to buy an upgrade, but each Upgrade can internally handle all of their logic, such as checking whether they have been purchased or unlocked. Lastly, the player has a public function to update their max health once an upgrade has been bought.

There was an assortment of other gameplay features added this sprint, such as these laser hazards. Much like damageable objects, I made an interface called IHazard that lets the player run their individual damage function on collision. Each hazard can then be customized to what they need to do, but for this, it just damages the player. Since they’re all in their own scripts, they can also be given custom movement, such as spinning or alternating.

Other additions include a rocket weapon for the player, which is about the same as the laser blaster but slower and more damaging. With the weapon system I designed last sprint, it was a breeze to add. I also let the player respawn and reset their ammo on death.
One last developer feature I added was an “Essentials” package prefab that level designers can place in their levels to automatically set up the player, camera rig, and UI. This was to make it easier for my team to get their levels working without needing me for help.
And that’s everything! I’m really happy with the work I put in this sprint. Just about every aspect of gameplay got some sort of improvement or addition here, and it’s really developing into a full game, more detailed than many projects I’ve worked on in the past. Still, my experience is guiding me well, and I’m familiar enough with these types of gameplay systems that I can implement them comfortably. I think I’m working at a very sustainable pace that should get all planned features implemented by the end of the project, since the core gameplay is well established and should be easy to add on to.

I started sprint 2 by working on the broadside cannons. Getting them to fire at the appropriate angles wasn’t too much trouble, but this did require some (anticipated) improvements to the weapon system.

I wrote each weapon its own script using a base abstract class. Each weapon is separately attached to the player’s arsenal, and the existing weapon switch controls will select the appropriate weapon script. This lets me use the same set of controls to give each weapon a unique set of functionality, while keeping each one modular and self-contained.

This gif shows off just about everything I got working this sprint, which was a lot! It all comes together seamlessly, but there are a ton of little moving parts I had to get working.
I started by making sure the player lasers could damage objects. Then, I set them up with healthbars and flashing when they get hit. Next I made sure the turrets could rotate to face the player. The easiest way to do this would have been to just use Unity’s LookAt() function, but, anticipating what the future turrets are going to need, I wanted to make them have to turn gradually to face the player.
So instead I set up a spherical linear interpolation function. For the projectiles, I had to additionally incorporate some trigonometric functions to get their angle to be correct. The awesome end result is that the cannon turrets track the player pretty well, but not perfectly, and are susceptible to missing when the player moves and turns quickly.

And once I got the cannon battlements firing, I set up a health bar for the player as well, and all the appropriate functions (damage flashing too). Standard stuff.
There were a whole host of other additions I made, such as the sprinting mechanics shown in this gif. It runs on a simple toggle system, but makes movement and combat quite a bit more interesting—it’s a lot harder to aim when you’re speeding up, which means it’s a bit of a tradeoff.
I also put together a pickup system that lets the player collect health and ammunition canisters. This is pretty standard from projects I’d worked on in the past, where there’s a base pickup class with a pickup function that can be customized to give the player whatever statistic is requested.
What did require more thought was getting them to spawn in an evenly distributed pattern.

This segment then got implemented for the space stations, which explode when their associated battlements are destroyed. Circles are tricky, but as always, some math can get it working. To let designers set this up however they want, the space stations have a publicly accessible list designers can place the matching battlements into. There’s a similar list for the pool of loot dropped.

Finally, I put together our first prototype by designing and implementing a miniature level that demonstrates all the mechanics created thus far. Our playtesters can try out flying the ship, firing the cannons, getting into fights with battlements, and collecting items.
Overall I’m super proud of the work I did this sprint, it puts our team in an amazing place to keep making progress on the game. I got a bunch of little systems all working together to create a cohesive combat system for the game. It looks obvious now that it’s put together, but even just this most basic enemy required both sets of projectiles, healthbars, aiming, and feedback. That’s why a lot of the code I wrote, such as the weapon system, is immensely scalable, meaning that future features will be even easier to implement.
Sprint 1 of Space Booty was a little shorter than usual, being only nine days, but with all my experience at this point I wanted to hit the ground running to be able to get to the fun parts. At this point, I’m pretty comfortable setting up things like player movement, camera controls, projectiles, pickups and the like, so it was mostly a matter of getting all the basics up to speed.
As the team’s lead programmer, I started by setting up the github page for our project and getting everyone on. Then I got right into the standard project stuff, using the new input system to setup basic Input Actions for player controls, and getting a basic gameobject for the player. I also made a script for the camera to follow the player around. At this point these all are tasks I’ve done for several projects before.

While it does use some resources, what’s nice about this camera system (as opposed to just making it a child of the player) is that it’s great at showing velocity and motion. Since the camera is interpolating to the player’s position, it lags behind a bit, so when the player character is moving really fast, it shows in its slight deviation from the screen center.
Next I got the camera to be able to rotate as well, and the designer handed me some changes to the movement to make W/S move forward and back and A/D turn the ship. I gave it a quick little model to help show off the ship’s orientation in testing.
Then I got to the weaponry, starting with projectiles. The laser beams have a simple script that propels them forwards, and I used Unity’s layer collisions to make sure they don’t collide with the player—a very comprehensive and solid solution.

I also put together a quick ammo system, with straightforward logic. Right now it just fires on player click, but in the future I also know how to get hold-to-fire if we want that instead (since I personally prefer it).
Our player is going to have at least five different weapons to use, which means I do have to start thinking about how to get that to work. Though I only setup the basic weapon this sprint, I began some framework to iterate on in the future. The player has a list of its weapons, referencing a Scriptable Object for each weapon. Right now, this is shown in how each weapon has its own ammo count. In the future, I’m going to need to figure out how to get each weapon to have different firing patterns for their projectiles.

One brand-new discovery I made this sprint came with the weapon switching system. I did a bit of research and figured out how to use one Input Action to map to all the different numbered keys, returning the number of the key that was pressed. This is super exciting since it saves a ton of lines of code by compressing them all into a single contextual function. There aren’t any weapon models in the game yet, but I was still able to show off this feature by adding some quick temporary UI. As you can see, it works flawlessly, and I’m really happy with it.
With that, the basics of player movement and attacking are totally good to go. Most of the work was pretty by-the-book for me, but I still got to make some new discoveries and I’m happy with how much I could get done in only a little over a week. Going forwards, I’m confident that I can get the programming totally under control for this game.
During Sprint 6, one of my points of focus was making a miniature level for the game’s tutorials. The start of this task meant diving into our level editor developer tool. While previously I had been able to use the tool just fine, what we needed was to be able to change the level size; a feature which the editor didn’t had. So, my first accomplishment was coding in a new setting for the level editor to set its size.

I found the section in the code that defined the level size, set it to a variable, and added an input field into the level editor. This way, any future designers will be able to make levels of varying sizes for different purposes.
I then used one of our level designer’s designs to build a simple level using the editor, and set up all the necessary infrastructure to get it functional in the game, which can be seen in the picture. One major change I had to make was how the camera worked; since it was designed around a 100-unit wide level. I modified the camera attributes to also take variable input in the designer, and set it to center around wherever it is first placed in the level. This way, I could constrain it to the much smaller level bounds.
Next, I did some more work with objectives. Since our team implemented a building tagging feature, I made a new type of objective for tagging buildings.


The TagObjective was pretty straightforward, just copying my methods for the UIObjective. The main addition was adding a customizable variable for the number of buildings that need to be tagged.
My main challenge was that each building tag is its own unique object, each with their own script that activates when clicked. In the main scene, there were 800. So in order to manage this preexisting system, I made a new script called the TagManager. Since all the tags were instantiated as children of the same object, I gave them a small addition that grabs reference to their parent on creation, which finds the TagManager. On click, they’ll reference back to the TagManager, which will keep track of how many tags have been added. This way, the TagManager can be the subject for the Object Observers, and tie back into the Objectives system. Following my patterns from before, I wanted to link together as few scripts as possible, so I think tying hundreds together into one was a successful way to integrate the two systems.

Following with objectives, I also began work on some integrations with the rescue system. The ScoreManager already keeps track of the number of people rescued, but I added a prototype UI element to display this to the player during testing and play. Lastly, I began setting up a bunch of the infrastructure for RescueObjectives that check how many people have been rescued, which will be expanded upon in the next sprint.
Now that the UI elements were created, during this Sprint I set to implement all the Objective UI so that the information gets dynamically communicated to the Player. For example, I started by making a dropdown menu that displays the current Objective.

It’s pretty straightforward. Since I made the ObjectiveManager a Singleton, it’s super easy to add scripts that can reference it. In this case, it let me make a simple script that displays the current objective. I did however have to learn how to make a Mask for the UI element, to make sure it doesn’t display over the top of the toolbar.
Next I worked on the actual Objectives menu, which is accessed from a button on the first dropdown.

It’s a pretty straightforward menu. There’s one tab for the current objectives, and one tab for the completed objectives. The script works just like the dropdown, except it runs through the whole list of objectives and adds them to a string to display. I haven’t used this much text in a 3D game before, but I got used to utilizing text displays during my other classes in c++, and this task helped me learn to do it in Unity.
Since I already made the Objective system, it was pretty simple to get them all to display here. The trickiest part was definitely the checkmarks on the completed screen. Rather than trying to place them on the screen separately from the text, I created a sprite sheet asset using the checkmark asset provided. Then, I could use TextMeshPro to place it as a symbol in text.

Lastly, I was assigned to make a sample level based on some tutorial designs to learn to use the Data Model Editor. I followed along with the existing video created by our predecessors, and also had to read some documentation to find information the video didn’t cover. Overall though I didn’t find the editor tool too difficult to use, and demonstrated by making this little sample scene. In the future, we may make some small, simple levels like this for the tutorial levels.
One limitation I did run into is that I couldn’t find a way to change the size of the ground itself. I limited the area I worked in to 4 chunks, so that we can carve it down in the future, but I’m not even sure if the tool has a feature to make the landscape smaller–I couldn’t find anything about it in the tool or documentation.
During this fourth sprint, I was focused on adding a developer console to the game. By the end of the sprint I had it fully functional, with three different commands and an easy way for more to be added in the future.
I’m still not 100% sure that this is the best way to make a developer console, since I know that OnGUI() is very resource intensive. But this is a tool intended only for developers that shouldn’t appear in the normal game, so it should be fine.
I didn’t actually know how to handle text input in Unity, so I did some research and followed a guide to get a base setup. This gave me the basics of taking and defining commands, and I borrowed the DebugCommandBase script. One change I made was simplifying it down to only one name for the command, since I figure if other people are adding commands in the future, it might be confusing to have to define a separate plaintext name and a command name.

The biggest original addition I added was an extra text line for feedback. I figured that as a developer, it’s important and useful to know that your command worked properly. In addition to the “Command not found” default message, the commands I implemented have success/failure messages to let the user know if the command activated successfully, or if it couldn’t.
For example, the first command I added was one that completes the current objective. To prevent errors, there’s a check to ensure there’s a current objective to complete. By making this function bool returning, I can return a different message whether or not it was successful. If it fails, the display message is instead, “All objectives already completed.”
The other command I implemented was one to skip the survey at the beginning of the program. This was pretty simple, thanks to the way commands can be given Actions to be Invoked. It’s a really elegant system.

One tricky part was setting up the help command. I’m not as used to UI elements, and it took a lot of tinkering to get the scroll field to display properly. The guide I was looking at set up the console at the top of the screen, but since our project needs it at the bottom, I had to change a lot of its orientation.
In terms of its place in the scene, I figured the script needed to be attached to the camera, since that’s the object that takes player input, and the console needs to be able to listen for certain commands (F12 to enable it and Return for processing).
Finishing off the sprint, I wrote up documentation for the feature so that future teams will be able to use and modify it. It’s a pretty straightforward feature. This was something that needed doing, and I needed something to do while waiting on some UI art to be made. Now that it’s ready, I look forward to the next sprint where I’ll be working on the front-facing UI for my objective system.
I went into designing this system with some idea of what to make. I knew that designers would need to be able to make customizable modular objectives and tell the game levels what order to progress through them in.
What was a huge help was a comprehensive list one of my team members put together of all the currently planned levels and objectives. This meant I didn’t have to make a universally-flexible system, just one that fit what we needed, which gave me some valuable direction. I looked at the list and broke it down into three categories: clicking on tiles, clicking on UI elements, and taking key input.

Initially I drew up a class diagram to figure out how I wanted my system to work, but I ended up iterating through so many different approaches it mostly just ended up as a brainstorming document. Objectives started more or less as I planned them, with one major exception. I knew I wanted an abstract class so that the three objective types could inherit it, but I ran into a huge problem pretty quickly.

I started by trying to implement TileObjectives (for clicking on tiles in game) and realized the issue: all of the relevant game data is stored in completely different places. TileObjectives needed to grab their info from the SelectionBoxManager, InputObjectives needed to take input from the CameraController, and UIObjectives needed to grab their info from three different layer visibility scripts.
This is why Objectives inherit from Observer—I decided to implement the Observer design pattern to try to tie together these tangled scripts. TileObjectives can observe the SelectionBoxManager in order to make sure they
Only run their check when the player clicks on a tile
Receive the game data needed to see if the Objective was completed
And this system worked awesomely! There were a few small hitches—I had to make some enums for ease of communication—but the last big one was for the UIObjectives. Like I mentioned, each UI element connected to code in a different script, so I made a LayerUIWrapper class that “wraps” together references and shared information for the different relevant UI scripts.

This is th e tutorial video I made for my team demonstrating how to use the objective system I designed this sprint. I’m really happy with h...